In our society, just think of that if there is no need to reuse wastewater, collected rainwater, then soak pits can provide the best alternative for a partial treatment of wastewater or ash. For example, septic tanks, double pits for flush toilets, anaerobic reactors, biogas collectors, etc.
It’s a very safe and healthy way to expel it into the environment and thus preserve groundwater resources from getting contaminated. A slight disorganized thing in building construction is the design of the septic tank and soak pit design for the homes. Here, in this article, we are going to explore soak pit design, health aspects, design considerations of soak pit, design of septic tanks, and many more things related to soak pit design.

What is Soak Pit?
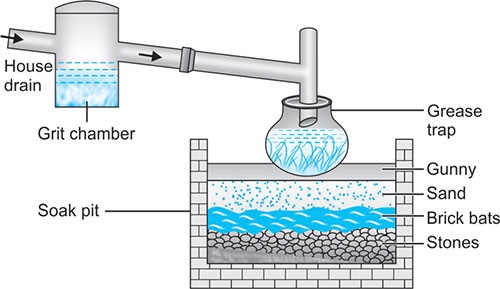
We can also call a soak pit as Soakaway or Leach Pit. Soak Pit is a closed absorptive chamber that lets water drain into the ground surface slowly. The chamber is directly connected to a primary treatment unit to soak into the ground surface. Soak Pit serves the purpose of allowing the waste-water coming from the septic tank. Once the waste-water permeates into the soil from the soak pit, tiny particles seep through the soil particles. And the organic materials are eaten by microorganisms.
The necessity for Soak Pit of Soak Pit Design
- The water which is obtained from a primary treatment unit is polluted. The examples of primary treatment units are septic tanks, a biogas settler, anaerobic baffled reactor, twin-pits, etc.
- The effluent water obtained from these primary treatment units is known as gray water or black water. The effluent water is then subjected to a partial treatment before allowing water to soak into the ground surface.
- To do this partial treatment process, there is a requirement of soak pit.
- It’s a very safe and healthy way to expel it into the environment and thus preserve groundwater resources from getting contaminated.
- In our society, there is no necessity to reuse wastewater, collected rainwater, that is obtained from the primary treatment unit.
Also Read : Basic Knowledge about Bridge Engineering
Functions of Soak Pit or Soak Pit Design
The grey or black water passing throughout the soak pit is subjected to the filtration process. Due to this filtration process, smaller particles of effluents settle down at the underside of the soak pit.
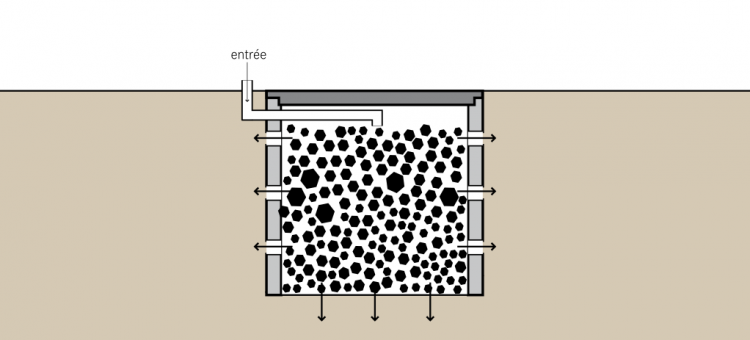
These small particles are eaten by the microorganisms which are an endurable operation of degradation. The processed water is then discharged out through the permeable wall of the soak pit.
Here are some of the important functions of a Soak Pit:
- Soak Pit serves the purpose of allowing the wastewater coming from the septic tank.
- Soak pit goes through the partial treatment of the effluent water passing out of the primary treatment unit.
- The soak pit expels clear and non-toxic water to the ground.
- The soak pit is constructed in such a way that the treated water leaks of the permeable walls of the soak pit.
- The soak pit helps to replenish the groundwater bodies.

Design Considerations of Soak Pit Design
The soak pit, essentially comprising a single well which is usually 1 cubic meter. The depth of the soak pit must be between 1.5 and 4 m deep. But, if we consider the general rule, it should never be less than 2 m above the water table.
Soak Pit must be placed at a distance of 30m (at least 20m) from the drinking water resources.
The soak pit must be placed away from regions of huge traffic so that the soil surface above and around it is not loaded.
Sometimes it is left vacant and banded with a passable material to give support and prevent failure, or left incomplete and recharged with thick stones and gravel.
The stones and gravel will stave off the walls from declining, but will still give sufficient space for wastewater.
In both cases, a covering of sand and fine gravel should be dissipated over the underside to help scatter the flow.
A removable top (made up of concrete) must be utilized to close off the pit until it needs to be maintained.
How to Make a Soak Pit?
Here are some of the steps you need to follow to make a soak pit:
- Unearth a cube on the surface that’s 3 feet to aside. Excavate the hole away from the deep, wet area and where there is limited access to people. The pit size might vary as per the available room and the kind of soil you are constructing in.
- Dig up a 1-foot-deep and six-inch-wide pit from the area with wasteful water to the soak pit. The pit should tilt 1/4 inch for every 10 feet in size to confirm the water soaks toward the pit.
- Wrap the walls of the excavation so that the soil does not fill inward to the trench.
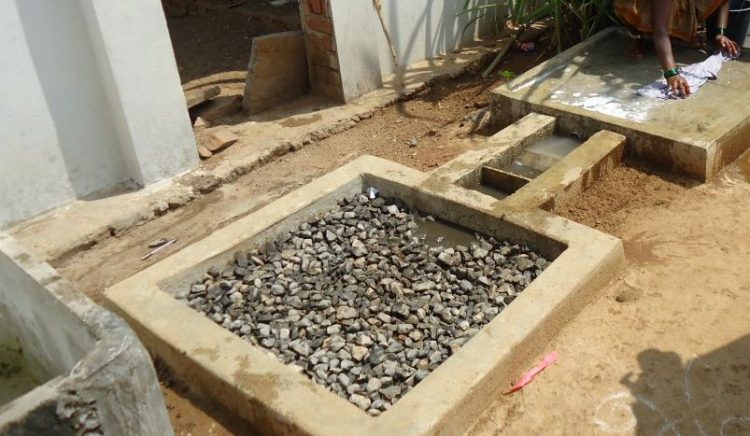
- Pile up the blocks on the cap of one another around the dug area, giving rise to a four-sided chamber. Leave sufficient room between two of the walls to allow passage by the drain pipe. Fill in the area between the exterior of the concrete blocks and the rims of the pit with soil.
- Combine together 4 parts of cement, 1 part of sand, and sufficient water to prepare a thin paste. Apply this over the dirt walls of the trench in a thin layer, departing a space for the drain pipe. Let the cement dry completely.
- Put 6 inches of sand or gravel on the underside of the pit. Detailed measurements or leveling is not instructed.
- Fill the soak pit with stones of various sizes. Do not tightly load the pit, which staves off water flow downward. The stones should be of an adequate amount to maintain the concrete block walls from propelling inward.
- Fill the drainage pit with 2 inches of stone.
- Put a PVC drain pipe on the gravel, penetrated side down. The pipe should span into the midst of the pit. Fill the pit with soil and level it off rarely higher than the prevailing soil. The soil will sit downward.
- Put a large, flat rock under the end of the pipe in the pit. This disburses the flow of water and prevents erosion of the rocks below.
- Cover the top of the pit with a wide sheet of metal or plywood. Put two or three concrete blocks or other huge objects on the top of the cover so that a child can’t open the pit.
Also Read : What is Concrete with Definition & History

Operation & Maintenance of Soak Pit
A well-constructed soak pit should continue between 3 and 5 years without sustenance.
The soak pit must be placed away from regions of huge traffic so that the soil surface above and around it is not loaded.
Sometimes it is left vacant and banded with a passable material to give support and prevent failure, or left incomplete and recharged with thick stones and gravel.
The stones and gravel will stave off the walls from declining, but will still give sufficient space for wastewater.
In both cases, a covering of sand and fine gravel should be dissipated over the underside to help scatter the flow.
A removable top (made up of concrete) must be utilized to close off the pit until it needs to be maintained.
Health Aspects
- We know that the soak pit is not utilized for raw sewage and storage. Treatment technology is functioning well and health problems will be minimum.
- As the soak pit is generally built under the ground, and therefore human beings and animals can’t come in contact with the effluent.
- Soak Pit must be placed at a distance of 30m from the drinking water resources.
- It can be built in most perceptive communities because the soak pit is usually odorless and can’t be seen as it is constructed underground.

Design considerations of Septic Tank Design
Common
- Ground and subsoil water should not penetrate the tank.
- The solid waste, paper, napkins should not be washed out into the septic tank to prevent the blockages.
- The wastewater of the kitchen should not reach the septic tank.
- In every 1 or 2 years, the sludge should be cleaned out.
Size and Specification
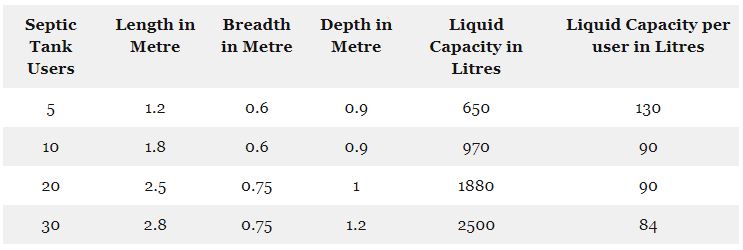
- The septic tank width should be 600mm and depth should be 1225mm comprising a freeboard of 300mm from the water level.
- A partition wall put up at a distance of half-length of the tank and a 150mm x 150mm hole is created at 450mm height in the wall to connect both chambers.
- The thickness should be a minimum of 230mm and the bed concrete should be constructed using M10 or M15 grade of Concrete.
- The inside and outside walls should be plastered with a minimum of 15mm consistency along with the waterproof chemical.
- The ventilation pipe must be lifted up 1800mm above the roof.
Standard Sizes of Septic Tank for Different Users
Advantages of Soak Pit
- It is a considerably modest and simple treatment.
- It is easy to construct and locally usable substance that can be employed for its construction.
- Small area is needed to place it.
- The prior cost, as well as the maintenance cost, is affordable.
- It works for the recharge of groundwater resources.
Disadvantages of Soak Pit
- It is acceptable only in areas where the soil is permeable and permits the percolation of wastewater.
- It is not applicable to highly clogged areas.
- If there is no primary treatment unit, then there might arise a high risk of clogging.
- It is not applicable to cold climatic conditions.
- It affects soil and groundwater bodies.
Final Verdicts
Hence, we discussed all the important things related to the soak pit design and septic tank. Soak Pit serves the purpose of allowing the wastewater coming from the septic tank. Treatment technology is functioning well and health problems will be minimum.
I hope you will find this content informative and useful. If you like this content, then please don’t forget to like, comment, and share with your friends.


Leave a comment